Pages

Wednesday, August 31, 2016

Crochet Shoulder Bag


I've crocheted so many bags already. But mostly big ones, this time I am making a small one. A shoulder bag. So easy to make and can be done fast.

Materials:

Instructions:
Take a look first of this picture of the bag. This is labeled according to it's parts so that you will better understand with my instructions that follow.


Body of the bag (make 1)

Chain 40 plus 1.

Row 1. SC in second chain from the hook. SC to end. Chain 1 and turn. (40SC)
Row 2. SC all stitches to end. Chain 1 and turn. (40SC)

Repeat Row 2 until Row 40.

Row 41. SC 10, HDC 5, DC10, HDC 5, SC 10. Chain 1 and turn. (40 Stitches)
Row 42. SC 17, chain 5, skip 5 stitches,  (this chain 5, skip 5 will be our buttonhole)  SC 18. Chain 1 and turn.  (40 Stitches)

Row 43. SC 10, HDC 5, DC10, HDC 5, SC 10. Chain 1 and turn. (40 Stitches)
Row 44. SC all stitches to end. Chain 1 and turn. (40 SC)

Break yarn and weave all ends

Sides of the Bag (make 2)

Chain 6 plus 1.

Row 1. SC in second chain from the hook. SC to end. Chain 1 and turn. (6SC)
Row 2. SC all stitches to end. Chain 1 and turn. (6SC)

Repeat Row 2 until Row 14. 

Break yarn and weave all ends

Assembly of the bag

Attached the sides of the bag with single crochets. Count 14 rows from the top to bottom of the body of the bag and attached it to the sides of the bag, secure it first with stitch markers. Then when you reached to the bottom, attached the next 6 rows of the body to the bottom of the sides ( the 6 foundation chains). Then again 14 rows up again, secure it with stitch markers first. When everything is secure that is when you start to SC everything. Do this also to the other side of the bag.

When all sides are securely attached weave all ends with your tapestry needle.

Then we will make the side ruffle. Actually it is just shell stitches. Attached your yarn at the end of Row 1 of your bag. Then Chain 1 and SC in the same stitch. Skip 2 stitches, DC 5 in the next stitch. Skip 2, SC in the next stitch, Skip 2 DC 5 in the next stitch. Do this pattern until you reached the end of Row 44. Then. slip stitch across the flip of the bag. Then do again the Shell stitches on the other side of the bag. When you are done, break yarn and weave all ends.

Grab the Lion Brand Bonbon in Dark Purple. Attached it again to Row 1 and Slip stitch all the way to all the Shell stitches, and the flip of your bag until your back again to where you first attached it. Break yarn and weave all ends.  This is how it looks below.

Attach your choice of button. Then let's make the Sling of the bag. I found this a very nice french braid from Knot Arts and use it in my bag. You can find the instructions and illustrations here

Also here is an alternative sling that I make. I used bag straps and ribbons. 


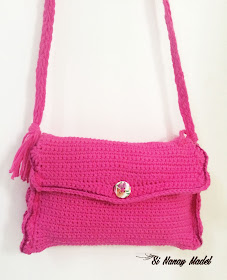
Here is another look of the bag that I made.

  
So that's it. I hope you all learn something and enjoy this post. If you have any questions, comments or suggestion just leave a message on the comment box and I will gladly answer them. Thank you and God bless!


xoxo

Nanay Madel


Don't forget to share on facebook, pinterest , twitter and more... Please bear with my pictures, I just took them using my phone. Thanks! 

**Please do not copy and post this pattern and claim it as your own. Please do not re-publish all photos from this blog as your own. You may make and sell products from my pattern. Please also link back to my post. Any link back will be much, much appreciated.Thank you very much. **
I always make sure to share also because I learn crochet for free and I got all of my patterns from all over the internet from some very generous bloggers. So please also click the links and support the bloggers.


Sunday, August 28, 2016

Free Pattern: 8 Beautiful Scarves around the Web


So many beautiful scarves around the web, from so many talented crocheters. Here my top favorites so far. And I might change my mind anytime soon because there are just so many beautiful scarves around the web. When you meet a crocheter he/she has definitely crocheted a scarf or two. And might even have his/her own designed scarf.  So here we go, my top favorites as of this time. And all patterns are for free as of posting.


  1. Sunset Scarf - by Elk Studio This is a very easy one. Almost all patterns here are very easy. And I like the colors. I always like sunset colors. 


  2. Crochet Coin Scarf . I like the stripes. I like it when it is not only in one color. But I also like solid colors especially when is it just white or black.
  3. Snow Drops Reversible Cowl - by Tamara  of Moogly Blog. I like this one so much. I really want to make this so badly but I wonder how am I supposed to use this one. I live in the Philippines and it is mostly sunny here and humid. I don't know if I will survive wearing this for a day. But who knows I might need this one and someday I will make this.
  4. One Skein Cowl with Lion Brand Textures Yarn by my very favorite crocheter! Sarah of Repeat Crafter Me blog. She don't usually make scarves, she is more on blankets and hats. But this one is really nice, plus the yarn is so nice. 
  5. The Boho Crochet Wrap by All About Ami. This has been my recent favorite blog. I like how easy this Wrap is and how big it is. You can wear it in so many ways. 
  6. Infinity Rugby Scarf a very good scarf for all ages. Teenagers and young adult would love this one. Can be worn anytime also. And can be worn with anything. Plus it is so easy to make good for beginners in crochet.
  7. Mountians Cowl by Gleeful things. Been eyeing this cowl for so long already. But my sister always tell me that I can't wear this one because it's too hot in here. I've been purchasing RH Boutique so many times and end up making something else. 
  8. Loopy Love Scarf by Tamara again. You might have noticed that I've always refer to Tamara's blog all the time. Yes! she is my favorite. And I love that she shares everything that she knows about crochet for free. And this one is so pretty I like the two tone color.


And for a bonus is my very own Granny Stitch Infinity Scarf  it so easy also and good for beginners and advanced crocheter.


So that's it. I hope you all learn something and enjoy this post. If you have any questions, comments or suggestion just leave a message on the comment box and I will gladly answer them. Thank you and God bless!


xoxo

Nanay Madel


Don't forget to share on facebook, pinterest , twitter and more... Please bear with my pictures, I just took them using my phone. Thanks! 

**Please do not copy and post this pattern and claim it as your own. Please do not re-publish all photos from this blog as your own. You may make and sell products from my pattern. Please also link back to my post. Any link back will be much, much appreciated.Thank you very much. **
I always make sure to share also because I learn crochet for free and I got all of my patterns from all over the internet from some very generous bloggers. So please also click the links and support the bloggers.
Monday, August 15, 2016

Granny Stitch Scarf


I've been doing so many granny projects these days. I've loved granny stitch ever before, but never really make  my own design out of it. So for starters, here is a very easy Granny Stitch Scarf. 


Materials:
  • Yarn
  • G or 4.00mm Hook
  • Tapestry needle
  • Scissors


Instructions.

Chain 65 or multiples of 4 plus 1.

Row 1 - DC in 3rd chain from the hook. DC in next chain. Chain 1, skip 1 chain. *DC in the next 3 chains. Chain 1, skip 1 chain* Repeat until you only have one chain left. DC in last chain. Chain 3 and turn.
Row 2 - 2 DC in chain 1 space. *Chain 1 Skip the 3 DC, 3DC in the chain 1 space.* Repeat  to end until you only have 3 stitches remaining. Chain 1 and DC in the last stitch. Chain 3 and Turn.
Row 3. - 2 Dc in chain 1 space. *Chain 1 Skip the 3 DC, 3DC in the chain 1 space.* Repeat  to end until you only have 3 stitches remaining. Chain 1 and DC in the last stitch. Chain 3 and Turn.

Row 4 - Row 82 . Same as Row 3.  

Then connect your two ends of the scarf by single crocheting together. 


So that's it. I hope you all learn something and enjoy this post. If you have any questions, comments or suggestion just leave a message on the comment box and I will gladly answer them. Thank you and God bless!


xoxo

Nanay Madel


Don't forget to share on facebook, pinterest , twitter and more... Please bear with my pictures, I just took them using my phone. Thanks! 

**Please do not copy and post this pattern and claim it as your own. Please do not re-publish all photos from this blog as your own. You may make and sell products from my pattern. Please also link back to my post. Any link back will be much, much appreciated.Thank you very much. **
I always make sure to share also because I learn crochet for free and I got all of my patterns from all over the internet from some very generous bloggers. So please also click the links and support the bloggers.

Tuesday, August 9, 2016

Over-sized Striped Market Bag

This my Over-sized Striped Market Bag. I love it very much. It's big enough for all my "things" to fit in. When you are a mother of a 3-year-old and a 6-year-old boys, when you went out of the house you just got to have all the "things" they need. Like for example, face towel, wet wipes, alcohol, hand sanitizer, snacks... I really snacks with an 's", extra tshirts or clothes, etc. The list could go on... and don't forget the Dinos! don't ever forget the Dinos mama! I really really need a big bag, big enough for all to fit in. 


Materials:

  • Gantsilyo Guru Bulky Cashmere Blend ( 1 cake each of Color #1 Denim, #2 Tomato Red, #3Stone, #4 Pine, #5Marigold) 
  • Susan Bates hook J or 6.0mm
  • Tapestry Needle
  • Stitch Markers
  • Scissors
  • 8 1 inch metal rings
  • cloth for lining

Instructions:

R1 - With Color #1, make magic ring and SC 6 into the ring. Closed the ring tightly, do not join, we will continue to crochet in round, that is why stitch markers are so important in this project. Use your stitch marker and put it on the last SC. (6SC) We will never join in the first stitch until we finish this bag.

R2 - SC 2 in each stitches ( 12SC)

R3- SC in first stitch, 2 SC in the next ,  repeat all the way around ( 18 SC)

R4- SC in first 2 stitches. 2 SC in the next ,  repeat all the way around ( 24 SC)

R5- SC in first 3 stitches, 2 SC in the next ,  repeat all the way around ( 30 SC)

R6 - SC in first 4 stitches, 2 SC in the next ,  repeat all the way around ( 36 SC)

R7 - SC in first 5 stitches, 2 SC in the next ,  repeat all the way around ( 42 SC)

R8 - SC in first 6 stitches, 2 SC in the next ,  repeat all the way around ( 48 SC)

R9 - SC in first 7 stitches, 2 SC in the next ,  repeat all the way around ( 54 SC)

R10 - SC in first 8 stitches, 2 SC in the next ,  repeat all the way around ( 60 SC)

R11 - Change to color # 2. SC in first 9 stitches, 2 SC in the next ,  repeat all the way around ( 66 SC)

R12 - SC in first 10 stitches, 2 SC in the next ,  repeat all the way around ( 72 SC)

R13 - SC in first 11 stitches, 2 SC in the next ,  repeat all the way around ( 78 SC)

R14 - SC in first 12 stitches, 2 SC in the next ,  repeat all the way around ( 84 SC)

R15 - SC in first 13 stitches, 2 SC in the next ,  repeat all the way around ( 90 SC)

R16 - SC in first 14 stitches, 2 SC in the next ,  repeat all the way around ( 96 SC)

R17 - SC in first 15 stitches, 2 SC in the next ,  repeat all the way around ( 102 SC)

R18 - SC in first 16 stitches, 2 SC in the next ,  repeat all the way around ( 108 SC)

R19 - SC in first 17 stitches, 2 SC in the next ,  repeat all the way around ( 114 SC)

R20 - SC in first 18 stitches, 2 SC in the next ,  repeat all the way around ( 120 SC) This is the end of the bottom of the bag.  From here on we will be using the hdc and the camel stitch.

R21 - Change to color # 3 (stone). Back post HDC all the way around. No more increases (120hdc).

R22 - HDC in the third loop of the previous round or do the camel stitch. Repeat this round all the way up to your desired length of the bag. Change color every 5 rounds.  For this bag I made I am up to 55 round. At  round 53 you attached the metal rings.  See video below on how to attached the rings. I attached them every 10 stitches. So I have a total of 10 rings(hole) for my cord to pass through for closing up the bag.

Part 2 for crocheting over the metal rings after you attached it. This is Round 54, and round 55 do the camel stitches as usual.


Make the cord by just braiding the yarns you are using. This is how it looks like after braiding them together.

R56 - With Color #5 (marigold) SC all the way around.
R57 -  Slip stitch all the way around. Then fasten off and weave all ends with your tapestry needle.

Now for the straps I used the Rainbow Lanyard pattern from Moogly's . It's pretty strong and not stretchy.  Make two straps and sew them on your bag.   Line your bag for better support. Especially a bag this big, you really need to line it. And with my lining I added some pockets inside for more storage.

This is how it looks with rings (hole), braided cord and straps.

Here is the finished bag. It's quite big and I love it. Just the way I want it. And I love how the yarns are so strong and bulky but has some sheer on it. All in all I love my new bag. As a mother I love it because I can put everything I needed and boys needs in one bag.


So that's it. I hope you all learn something and enjoy this post. If you have any questions, comments or suggestion just leave a message on the comment box and I will gladly answer them. Thank you and God bless!


xoxo

Nanay Madel


Don't forget to share on facebook, pinterest , twitter and more... Please bear with my pictures, I just took them using my phone. Thanks! 

**Please do not copy and post this pattern and claim it as your own. Please do not re-publish all photos from this blog as your own. You may make and sell products from my pattern. Please also link back to my post. Any link back will be much, much appreciated.Thank you very much. **
I always make sure to share also because I learn crochet for free and I got all of my patterns from all over the internet from some very generous bloggers. So please also click the links and support the bloggers.


Sunday, August 7, 2016

Camel Stitch

Have you ever heard this before? Camel stitch? I already know this stitch a very long time ago but I never know that it is called Camel stitch. Maybe because it is done on the third loop or the 2nd back loop of a Half Double Crochet (hdc). But to those who do not know it. Here are some pictures I took while making this Oversized Striped Market Bag.

Insert your hook on the 3rd loop of a hdc. It's the loop at the back. 

Then do your usual hdc. Draw up a loop, yarn over and pull through to all loops. 

And your stitches will look like this. It looks like a knitting stitch but a crochet one. That's how it looks like. BUT! if you still don't know how to do it. Here is a video on how to do it.


So that's it. I hope you all learn something and enjoy this post. If you have any questions, comments or suggestion just leave a message on the comment box and I will gladly answer them. Thank you and God bless!


xoxo

Nanay Madel


Don't forget to share on facebook, pinterest , twitter and more... Please bear with my pictures, I just took them using my phone. Thanks! 

**Please do not copy and post this pattern and claim it as your own. Please do not re-publish all photos from this blog as your own. You may make and sell products from my pattern. Please also link back to my post. Any link back will be much, much appreciated.Thank you very much. **
I always make sure to share also because I learn crochet for free and I got all of my patterns from all over the internet from some very generous bloggers. So please also click the links and support the bloggers.