Sunday, November 25, 2018

Sweet Berry Hat


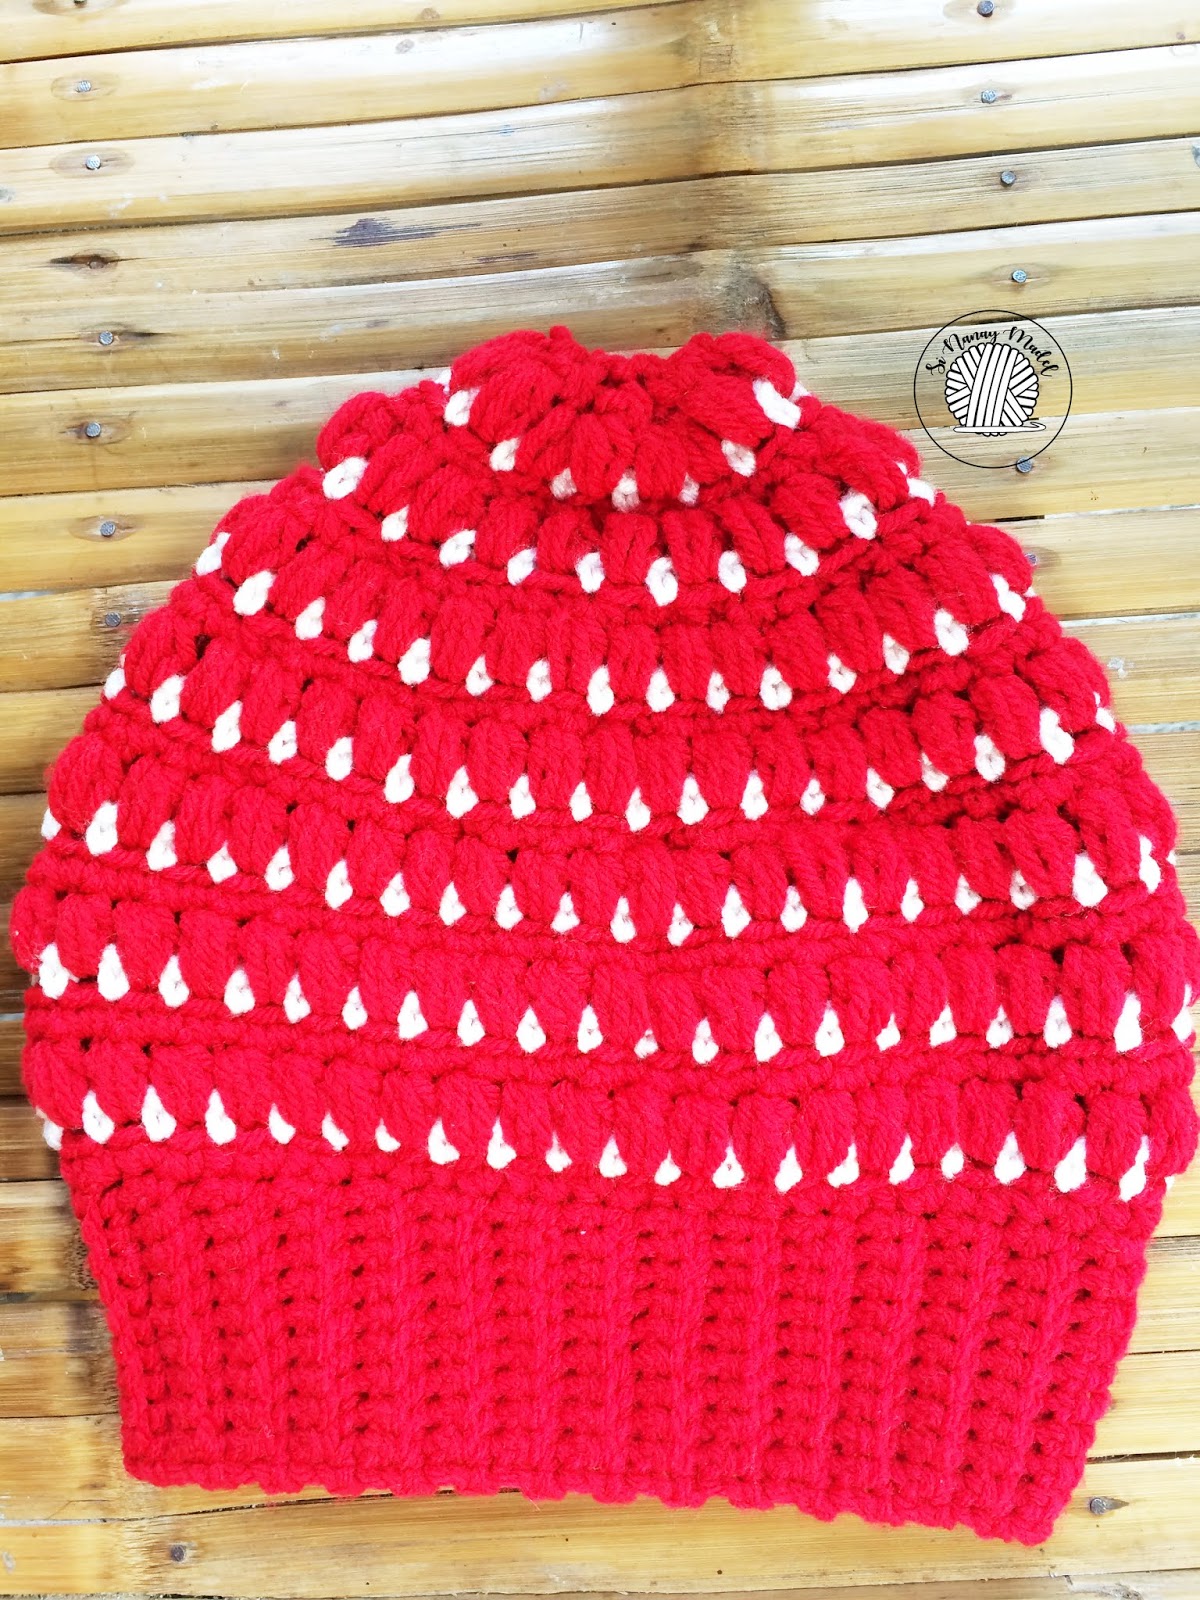
While I was making this hat, my husband commented that it looks like a strawberry. But I don't want to name it a "Strawberry Hat" because there is no leaf or stem at the top of it. So I named it "Sweet Berry Hat" so that you can make it with any color you like.

The stitch I used in this hat is the same stitch I used in my Blue Bag. There is a Photo Tutorial in that pattern if you want to see how it is done. It's quite easy once you got the hang of it. So go ahead and give it a try. 


Materials
  • Red Heart with Love Holly Berry (COLOR A)
  • Red Heart with Love Eggshell (COLOR B)
  • I/5.5 mm Crochet Hook
  • Scissors
  • Tapestry Needle
  • Pompom Maker (Optional)


Stitches Used
  • CH(s) – Chain(s)
  • SC – Single Crochet
  • PS – Puff Stitches
  • BLO – Back Loop Only
  • SC dec – Single Crochet Decrease


Notes
  • Puff Stitches(PS) – With a loop on the hook, *yarn over once and insert hook into the indicated stitch, yarn over and pull up a loop*. Repeat this process 4 times. If you want puffier Puff Stitch you can do it 5 times. Yarn over and pull through all loops.  
  • Starting Chains are not counted as a stitch
  • The ribbing is worked in Rows
  • The body of the hat is worked in Rounds
  • If you want a wider ribbing CH 11 for a regular wide CH 7
  • The Instructions below have a wider rib
  • The Pattern is written in Adult Sizes, the number of stitches for each size are indicated inside the parenthesis as follows- (ADULT, TEENAGER, CHILD, TODDLER) Example. (60,57,54,51)

Sizes
  • ADULT – Ribbing until Row 60
  • TEENAGER -  Ribbing until Row 57
  • CHILD – Ribbing Until Row 54
  • TODDLER – Ribbing Until Row 51

I've been asked many times on how do I closed the top of my Hat. Below is a little Photo Tutorial on how I closed the top of my Hat. I used this method in all of my hat that is worked from the ribbing up.  I used this technique also in closing the top of my Ridged Mittens.

  1. Leave a long tail enough for sewing the top of your hat.
  2. Then using your tapestry needle, run the yarn through in all of the remaining stitches of the last row.
  3. Then cinch closed the top of your hat.


Instructions
Ribbing
Row1. With Color A,  CH 11, SC into the 2 SC from the hook and into all the stitch across. CH1 and turn. (10 SC)
Row2-60. SC in the first stitch, SC in the BLO into the next 8 stitches, then SC on both loops for the last stitch (10 SC)

Join both ends together by slip stitching both ends together. Then turn your work into the RS, and continue to work the body of the hat this time in ROUNDS.

The body of the Hat

Round 1. Worked in each row edge of the ribbing. CH 1, 1 SC in the first stitch and in the next stitch. 2 SC in the next stitch. * 1 SC in the next 2 stitches, 2 SC in next. * Repeat all the way around until the end. Then Join with a slip stitch in the first stitch. (80, 76, 72, 68)

Round 2. Change to Color B. CH1, SC in the first stitch. * CH1, skip a stitch, SC into the next stitch. Repeat all the way around until the end. Then Join with a slip stitch in the first stitch. (40, 38, 36, 34 SC and 40, 38, 36, 34 CH1)

Round 3. Change to Color A. Slip stitch into the first SC, Slip stitch again into the CH1 space. Pull the working loop up to the height of your puff stitch, maybe same as a DC height. *Make a PS into the CH 1 space, then CH 1* Repeat this until the end, ending with a CH1. Join with a slip stitch on top of the first PS. (40,38,36,34 PS)

Round 4. CH1, and SC in the same stitch. SC in each PS and in each CH1 spaces. At the end the make sure to make a SC on that last CH1 space. Count your stitch and make sure you still have the correct number of stitches. Join with a slip stitch in the first stitch. (80,76,72,68 SC)

Round 5 to 9. Repeat Round 2 to 4 respectively, ending with Round 3.

Round 10.  CH 1, 1 SC in the first 6 stitches, SC dec in next. * 1 SC in the next 6 stitches, SC dec in next.* Repeat all the way around until the end. Make your stitches even, so for the odd number of stitches (TEENAGER to TODDLER) add 1 more stitch at the end. Then join with a slip stitch in the first stitch. ( 70, 68, 64, 62 SC )

Round 11. Repeat Round 2.  (35, 34, 32, 31 SC and 35, 34, 32, 31 CH1)

Round 12. Repeat Round 3. (35, 34, 32, 31 PS)


Round 13. CH 1, 1 SC in the first 5 stitches, SC dec in next. * 1 SC in the next 5 stitches, SC dec in next.* Repeat all the way around until the end. Make your stitches even, so for the odd number of stitches (TEENAGER to TODDLER) add 1 more stitch at the end. Then join with a slip stitch in the first stitch. (60, 58, 54, 52 SC )

Round 14. Repeat Round 2.  (30, 29, 27, 26 SC and 30, 29, 27, 26 CH1)

Round 15. Repeat Round 3. (30, 29, 27, 26 PS)

Round 16.  CH 1, 1 SC in the first stitch, SC dec in next. * 1 SC in the next stitch, SC dec in next.* Repeat all the way around until the end. Make your stitches even, so for the odd number of stitches (TEENAGER to TODDLER) add 1 more stitch at the end. Then join with a slip stitch in the first stitch. ( 40, 40, 36, 36 SC )

Round 17. Repeat Round 2.  (20, 20, 18, 18 SC and 20, 20, 18, 18 CH1)

Round 18. Repeat Round 3. (20, 20, 18, 18 PS)

Round 19.  CH 1, 1 SC in the first 2 stitches, SC dec in next. * 1 SC in the next 2 stitches, SC dec in next.* Repeat all the way around until the end. Make your stitches even, so for the odd number of stitches (TEENAGER to TODDLER) add 1 more stitch at the end. Then join with a slip stitch in the first stitch. ( 30, 30, 28, 28 SC )

Round 20.  Repeat Round 2.  (15, 15, 14, 14 SC and 15, 15, 14, 14 CH1)

Round 21. Repeat Round 3. (15, 15, 14, 14 PS)

Round 22. CH1, SC dec in all stitches all the way around until the end. Join with a slip stitch in the first stitch. ( 15,15,14,14 SC)

Cut yarn and leave a tail long enough for sewing. Using your tapestry needle, run the yarn (tail) through all the stitches in Round 22  and cinch closed the top of your hat. Fasten off and weave in all ends at the WS of your hat.


OPTIONAL

Using your pompom maker or any method you like to, make a pompom and attached it to your hat. 


That's it, I hope you all learn something and enjoy this post. If you have any questions, comments or suggestion just leave a message in the comment box and I will gladly answer them. And don't forget to Tag me on Instagram and Twitter with your finished project and also like my Page on Facebook, Si Nanay Madel. I would love to see what you've done and Pin it also on Pinterest. Thank you and God bless!


XOXO

Nanay Madel


Don't forget to share on Facebook, Pinterest, Twitter and more. Go check my Ravelry Store for more patterns. 

**Please do not copy and post any pattern from this blog and claim it as your own. This pattern is limited to personal use only.  Please do not re-publish all photos from this blog as your own. You may make and sell products from my patterns. Please also link back to my post. Any link back will be much, much appreciated. Thank you very much.


Thought of the Day

November 25, 2018


I saw that costly buildings in the cities, supposed to be fire-proof, would be consumed by fire. — 3MR 310

Wednesday, November 21, 2018

Jaisha Hat

I've been playing with this stitch for quite so time already. I have posted on my Instagram about a skirt that I've been making using this stitch. But to be honest, up until now I have not finished that skirt.

So I decided to make something smaller so that I'll be able to finish it fast and enjoy wearing it. So I made this Jaisha Hat. This hat is named after the model itself. She is my beautiful niece Jaisha. You have seen her model some of my pieces here on this blog. She looks so pretty on anything I have done.


The size of this hat is very flexible. It can fit from a Child up to an Adult. The hat that Jaisha is wearing is the same hat that I am wearing. It's because of the type of ribbing I used this hat. It's has a garter like finish, it can stretch pretty well. It may take more time to make this ribbing than the ones I've been using always but it is worth it. Plus you will be surprised that the body of the hat works up really fast.  You can actually make 2 hats without a pompom with just 1 ball of Lion Brand Ice Cream.

For more information visit my Ravelry and Craftsy Store. INSTANT download 

7 Pages Pattern - The first page is the Cover Page then the next 3 Pages is the entire pattern with PHOTO TUTORIALS. The 5th Page is just Photos of the Hat.

-The last 2 pages is a printer friendly pattern (No Photos Included)


Materials:
  • Lion Brand Ice Cream Yarn ( Blueberry)
  • H/5.00mm Crochet Hook
  • Tapestry Needle
  • Scissors
  • Pompom Maker (Optional)


Stitches Used
  • CH(s) – Chain(s)
  • SL ST – Slip Stitch
  • SC – Single Crochet
  • DC – Double Crochet
  • DC4gdr – Double Crochet 4 Together
  • DC5gdr – Double Crochet 5 Together
  • DC9gdr – Double Crochet 9 Together

Notes
  • Beginning CH 1s are NOT counted as a stitch
  • Beginning CH 3s ARE COUNTED as a stitch
  • In DOUBLE CROCHET # TOGETHER, gather all stitch by Yarning over and pull through all stitch then CH 1 to close it. DO NOT tighten your CH 1 very much for the next row you will be making 9 DCs in it.


The ribbing is a multiple of 10. With the Lion Brand Ice Cream yarn, I made 100 rows for the ribbing because of the size of the yarn (Light #3). But when I used Primer Yarns which is Medium #4 I only made 90 rows for the ribbing. That is the gauge for the ribbing.  When it comes to the body of the hat the gauge is not that important.


That's it, I hope you all learn something and enjoy this post. If you have any questions, comments or suggestion just leave a message in the comment box and I will gladly answer them. And don't forget to Tag me on Instagram and Twitter with your finished project and also like my Page on Facebook, Si Nanay Madel. I would love to see what you've done and Pin it also on Pinterest. Thank you and God bless!


XOXO

Nanay Madel


Don't forget to share on Facebook, Pinterest, Twitter and more. Go check my Ravelry Store for more patterns. 

**Please do not copy and post any pattern from this blog and claim it as your own. This pattern is limited to personal use only.  Please do not re-publish all photos from this blog as your own. You may make and sell products from my patterns. Please also link back to my post. Any link back will be much, much appreciated. Thank you very much.


Thought of the Day

November 21, 2018

The firemen were unable to operate the engines. — 9T Ch.1

Monday, November 12, 2018

Ridged Mittens


I have never made mittens pattern that much. In fact, I only have one Mittens Pattern, it's because of the fact that I cannot use it. But now my sister and her whole family are migrating to the USA  I am compelled, yes, compelled to make mittens for them. So I try to make one and it turns out beautiful. I guess I'll be making more in the coming days.

This mittens has a long cuff for a warmer protection. You can wear it as it is or you can fold it. This is a simple pattern and easy to follow. 

I used RHSS Ombre, if you will continue to work on the same yarn end for both hands, the other hand will be lighter because of how the color changes in RHSS Ombre. What I did was, I used the inner yarn for the right hand, then cut my yarn, used the outer yarn for the left hand (or vice versa) so that the color would be the same. But you can use any type of yarn as long as it is medium (#4).


Materials

  • RH Super Saver Ombre
  •  H/5.0mm Crochet Hook
  • Stitch Markers
  • Scissors
  • Tapestry Needle

Stitches Used

  • CH(s) – Chain(s)
  • SC – Single Crochet
  • SC dec – Single Crochet Decrease
  • HDC – Half Double Crochet
  • HDC dec – Half Double Crochet Decrease
  • CS – Camel Stitch

Notes

  • The Mittens are worked in rounds, no joining at the end of each round. So stitch marker will surely help
  • Camel Stitch -  HDC in the third loop of the HDC in the previous round.


Size – Adult

Instructions

CUFF

Row1. CH 21, SC in the 2nd CH from the hook. SC all the stitches to the end. (20 SC)

Row 2-28. CH 1, SC in the first stitch on both loops, SC in the next 18 stitches in the back look only. SC in the last stitches on both loops. (20 SC)

Fold work in half and join both ends with slip stitches to form the Cuff. The Cuff is long enough for more protection or you can fold also if you want. Do not cut the yarn. Turn your work to the right side and continue working for the mittens. Working now in Rounds without joining use your stitch marker to mark either your first or your last stitch.

HAND
Round 1. SC in each row side of the cuff. (28 SC)

Round 2. HDC in each stitch until the end. (28 HDC)

Round 3. All SC stitches will be done in the 3rd loop of the HDC in the Previous round.   SC in the first 13 stitches, 2 SC in next. SC in the next 13 stitches 2 SC in the last stitch. (30 SC)

Round 4. HDC in the first 14 stitches, 2 HDC in next. HDC in the next 14 stitches and 2 HDC in the last stitch. (32 HDC)

Round 5. All SC stitches will be done in the 3rd loop of the HDC in the Previous round.   SC in the first 15 stitches, 2 SC in next. SC in the next 15 stitches 2 SC in the last stitch. (34 SC)

Round 6. HDC in the first 16 stitches, 2 HDC in next. HDC in the next 16 stitches and 2 HDC in the last stitch. (36 HDC)

Round 7-8. CS in all the stitches all the way around until the end. (36 HDC)

Round 9. All SC stitches will be done in the 3rd loop of the HDC in the Previous round. SC in each stitch all the way around until the end. ( 36 SC)

Round 10. HDC in all stitches all the way around until the end. ( 36 HDC)

RIGHT  HAND
Round 11. All SC stitches will be done in the 3rd loop of the HDC in the Previous round. SC in the first 6 stitches, Skip 8 stitches(thumb opening), CH 6.  SC in the next 22 stitches.  ( 28 SC and 6 CHs)

LEFT HAND.
Round 11. All SC stitches will be done in the 3rd loop of the HDC in the Previous round. SC in the first 26 stitches, Skip 8 stitches(thumb opening), CH 6.  SC in the last 2 stitches.  ( 28 SC and 6 CHs)

Round 12. HDC in all stitches all the way around until the end, including the CH 6. In the CH 6 make sure to HDC in one loop only so that the other loop will be for the Thumb stitches later. (34 HDC)

Round 13-16. CS in all the stitches all the way around until the end. (34HDC)

Round 17. All SC stitches will be done in the 3rd loop of the HDC in the Previous round. SC in the first 15 stitches, SC dec in the next 2. SC in the next 15 stitches, SC dec in the last stitches. ( 32 SC)

Round 18. HDC in the first 14 stitches, HDC dec in the next 2. HDC in the next 14 stitches, HDC dec in the last stitches ( 30 HDC)

Round 19. All SC stitches will be done in the 3rd loop of the HDC in the Previous round. SC in each stitch all the way around until the end. ( 30 SC)

Round 20. HDC in all stitches all the way around until the end. ( 30 HDC)

Round 21. All SC stitches will be done in the 3rd loop of the HDC in the Previous round.  SC in the first 4 stitches, SC dec in the next 2. * SC in the next 4 stitches, SC dec in the next 2.* Repeat until the end. ( 25 SC)

Round 22. HDC in all stitches all the way around until the end. ( 25 HDC)

Round 23-26. CS in all the stitches all the way around until the end ( 25 HDC)

Round 27.  All SC stitches will be done in the 3rd loop of the HDC in the Previous round.  SC in the first 3 stitches , SC dec in the next 2. * SC in the next 3 stitches, SC dec in the next 2.* Repeat until the end. ( 20 SC)

Round 28. HDC in the first 2 stitches , HDC dec in the next 2. * HDC in the next 2 stitches , HDC dec in the next 2. * Repeat until the end. ( 15 SC)

Round 29. SC Dec in all stitches except the last stitch, all done in the 3rd loop. Then SC the last stitch. (8 SC).

Cut the yarn long enough for closing and weaving the ends. With your tapestry needle, run the yarn through all the 8 stitches, then cinch closed your mittens. Weave the ends at the wrong side of the mittens.

THUMB

When working in the thumb area, you start at the corner then gather 3 stitches (like in the picture) and make your first SC. Also when you encounter the other corner of the hole, gather also 3 stitches and make the SC, so that there'll be less "holes" in your mittens.


Round 1. Attach yarn and SC in each of the 3rd loop of the HDC in the previous round. SC in the opposite Loop of the CH 6. (14  SC)

Round 2. HDC in each stitch all the way around. ( 14 HDC)

Round 3.  All SC stitches will be done in the 3rd loop of the HDC in the Previous round.  SC in the first 5 stitches, SC dec in the next 2. SC in the next 5 stitches, SC dec in the last stitches. ( 12 SC)

Round 4. HDC in each stitch all the way around . (12 HDC)

Round 5-7. CS in all the stitches all the way around until the end ( 12 HDC)

Round 8. SC dec all done in the 3rd loop all the way around until the end. ( 6 SC)


Cut the yarn long enough for closing and weaving the ends. With your tapestry needle, run the yarn through all the 6 stitches, then cinch closed your mittens. Weave the ends at the wrong side of the mittens.

I made another one using RH Multis in Autumn. 

That's it, I hope you all learn something and enjoy this post. If you have any questions, comments or suggestion just leave a message in the comment box and I will gladly answer them. And don't forget to Tag me on Instagram and Twitter with your finished project and also like my Page on Facebook, Si Nanay Madel. I would love to see what you've done and Pin it also on Pinterest. Thank you and God bless!


XOXO

Nanay Madel


Don't forget to share on Facebook, Pinterest, Twitter and more. Go check my Ravelry Store for more patterns. 

**Please do not copy and post any pattern from this blog and claim it as your own. This pattern is limited to personal use only.  Please do not re-publish all photos from this blog as your own. You may make and sell products from my patterns. Please also link back to my post. Any link back will be much, much appreciated. Thank you very much.


Thought of the Day

November 12, 2018

It is in the home that the education of the child is to begin. — CG 17


Sunday, November 4, 2018

Azura Slouchy Hat

I've been working so much on Haldf Double Crochet these days. And this hat is again composed mainly of HDCs. This is a simple one and can be done quickly. 
I used Red Heart Super Saver Ombre in Scuba. I love the color changes in this yarn, I think I'll be making more projects with RHSS Ombre in the coming days. 


Materials

  • Red Heart Super Saver Ombre in Scuba
  • H/5.00mm Crochet Hook
  • Tapestry Needle
  • Scissors

Stitches Used
  • CH(s) - Chain(s)
  • SC - Single Crochet
  • HDC - Half Double Crochet

Notes
  • Starting CHs are not counted as a stitch
  • Sizes variation are indicated in the pattern. Number of stitches are indicated inside the parenthesis as follows - (CHILD, TEENAGER, ADULT)
  • Camel Stitches  are done in the 3rd loop of a Half Double Crochet

Gauge - 6 HDC rows X 9 HDC stitches = 2 inch square


Size - CHILD, TEENAGER, ADULT


Instructions

Round 1. Magic ring. CH 1 and 10 HDC into the ring. Closed the ring tightly, join in the first stitch. (10HDC)

Round 2. CH1, 2 HDC in each stitch all the way around. Join in the first stitch. (20 HDC)

Round 3. CH1, 1 HDC in the first stitch, 2 HDC in next. * 1 HDC in the next stitch, 2 HDC in next.* Repeat all the way around. Join with a slip stitch in the first stitch. (30 HDC)

Round 4. CH1, 1 HDC in the first 2 stitches, 2 HDC in next. * 1 HDC in the next 2 stitches, 2 HDC in next.* Repeat all the way around. Join with a slip stitch in the first stitch. (40 HDC)

Round 5. CH1, 1 HDC in the first 7 stitches, 2 HDC in next. * 1 HDC in the next 7 stitches, 2 HDC in next.* Repeat all the way around. Join with a slip stitch in the first stitch. (45 HDC)

Round 6. CH1, 1 HDC in the first 8 stitches, 2 HDC in next. * 1 HDC in the next 8 stitches, 2 HDC in next.* Repeat all the way around. Join with a slip stitch in the first stitch. (50 HDC)

Round 7. CH1, 1 HDC in the first 4 stitches, 2 HDC in next. * 1 HDC in the next 4 stitches, 2 HDC in next.* Repeat all the way around. Join with a slip stitch in the first stitch. (60 HDC)

Round 8. CH1, 1 HDC in the first 9 stitches, 2 HDC in next. * 1 HDC in the next 9 stitches, 2 HDC in next.* Repeat all the way around. Join with a slip stitch in the first stitch. (66 HDC)
Stop in this round and proceed to round 11 for the size of a CHILD.

Round 9. CH1, 1 HDC in the first 10 stitches, 2 HDC in next. * 1 HDC in the next 10 stitches, 2 HDC in next.* Repeat all the way around. Join with a slip stitch in the first stitch. (72 HDC)
Stop in this round and proceed to round 11 for the size of a TEENAGER.

Round 10. CH1, 1 HDC in the first 11 stitches, 2 HDC in next. * 1 HDC in the next 11 stitches, 2 HDC in next.* Repeat all the way around. Join with a slip stitch in the first stitch. (78 HDC)

Round 11. CH1, HDC in all stitches in the 3rd loop of the HDC in the previous round (Camel Stitch). (66,72,78 HDC)

Round 12-14. CH 1, HDC in all stitches all the way around. (66,72,78 HDC)

Round 15-26. Repeat Round 11-14 respectively.  (66,72,78 HDC)

Round 27.  CH1, HDC in all stitches in the 3rd loop of the HDC in the previous round (Camel Stitch).(66,72,78 HDC)

Round 28.  CH1, SC in all stitches in the 3rd loop of the HDC in the previous round. (66,72,78 SC)


Round 29-36. CH1, SC in all stitches all the way around.  (66,72,78SC)

Fasten off and weave in all ends.

That's it, I hope you all learn something and enjoy this post. If you have any questions, comments or suggestion just leave a message in the comment box and I will gladly answer them. And don't forget to Tag me on Instagram and Twitter with your finished project and also like my Page on Facebook, Si Nanay Madel. I would love to see what you've done and Pin it also on Pinterest. Thank you and God bless!


XOXO

Nanay Madel


Don't forget to share on Facebook, Pinterest, Twitter and more.  

**Please do not copy and post any pattern from this blog and claim it as your own. This pattern is limited to personal use only.  Please do not re-publish all photos from this blog as your own. You may make and sell products from my patterns. Please also link back to my post. Any link back will be much, much appreciated. Thank you very much.


Thought of the Day

November 4, 2018


Jesus was the commander of the heavenly intelligences, and the adoring homage of the angels was received by Him as His right. — LHU 16