Sunday, October 29, 2017

Red Mini- Shoulder Bag


This is a very cute bag.  It is easy to make perfect for mommy and me duo.  It's easy to make also, a beginner in crochet can surely work this one out in no time.

Materials

  • Red Heart With Love in Holly Berry (100-130 yards)
  • H/5.0mm Crochet Hook
  • Stitch Markers
  • Tapestry needle
  • Gold Button
  • Gold Chain
  • Scissors
Terms Used:

  • CH(s) - Chain(s)
  • SC - Single Crochet
Special Stitch - Crab Stitch


Instructions


Make 2.

R1. CH 13, SC in the 2nd CH from the hook. SC in each stitch till the end. CH1 and turn. (12 SC)

R2. SC 2 in the first stitch, SC 1 in each of the next 10 stitches. SC 2 in the last stitch. CH1 and turn. (14 SC)

R3. SC 2 in the first stitch, SC 1 in each of the next 12 stitches. SC 2 in the last stitch. CH1 and turn. (16 SC)

R4. SC 2 in the first stitch, SC 1 in each of the next 14 stitches. SC 2 in the last stitch. CH1 and turn. (18 SC)

R5. SC 2 in the first stitch, SC 1 in each of the next 16 stitches. SC 2 in the last stitch. CH1 and turn. (20 SC)

R6-R7. SC 1 in each stitch till the end. CH1 and turn. (20 SC)

R8. SC 2 in the first stitch, SC 1 in each of the next 18 stitches. SC 2 in the last stitch. CH1 and turn. (22 SC)

R9. SC 2 in the first stitch, SC 1 in each of the next 20 stitches. SC 2 in the last stitch. CH1 and turn. (24 SC)

R10 – R19. SC 1 in each stitch till the end. CH1 and turn. (24 SC)

R20. SC decrease in first 2 stitches. SC 1 in each of the next 20 stitches. SC decrease in the last 2 stitch. CH 1 and turn. (22 SC)

R21 – R25. SC 1 in each stitch till the end. CH1 and turn. (22 SC)

On the second one do not fasten off. Continue working on R26 for the Cover of the bag.

R26 – R40. SC 1 in each stitch till the end. CH1 and turn. (22 SC)

R41. SC 2 in the first stitch, SC 1 in each of the next 20 stitches. SC 2 in the last stitch. CH1 and turn. (24 SC)

R42-R46. SC 1 in each stitch till the end. CH1 and turn. (24 SC)

R47. SC Decrease in first 2 stitches, SC in each of the next 20 stitches, SC dec in the last two. CH1 and Turn. (22SC)

R48. SC 1 in each stitch till the end. CH1 and turn. (22 SC)

R49. SC Decrease in first 2 stitches, SC in each of the next 18 stitches, SC dec in the last two. CH1 and Turn. (20SC)

R50. SC Decrease in first 2 stitches, SC in each of the next 16 stitches, SC dec in the last two. CH1 and Turn. (18SC)

R51. SC Decrease in first 2 stitches, SC in each of the next 5 stitches skip 3 stitches and CH 3, SC in the next 6 stitches, SC dec in the last two. CH1 and Turn. (13 SC plus 3 CHs)

R52. SC Decrease in first 2 stitches, SC in each of the next 12 stitches, SC dec in the last two. CH1 and Turn. (14 SC)

R53. SC Decrease in first 2 stitches, SC in each of the next 10 stitches, SC dec in the last two. CH1 and Turn. (12 SC)

R54. SC 1 in each stitch till the end. CH1 and turn. (12 SC)

Side Band

R1. Foundation CH of 8, SC in the 2nd CH from the hook and all the way to the end. CH 1 and turn. ( 7SC)

R2-R62. SC in each stitch until the end. CH 1 and Turn. (7SC)

Fasten off and leave a long tail about 3 feet for sewing.


Now to sew the sideband your stitch markers will come in handy. First attached it using your stitch markers and use the long tail you've left in your band to sew the band to the body of the bag. There are many ways to attach the band, it's either you can Single Crochet them together with the body of the bag or you can whip stitch it. You can use anything you like.

 After everything is attached, it's optional but highly recommended to Crab Stitch the sides of your bag including the sides of the cover. 


Then attach a golden chain, the length would depend upon your liking, on the sides of your bag. I recommend on the  3rd row from the end of your sideband. 

I was looking for some gold rings also to attach to my bag before the chains, but I could not find one here so I just attach the chains directly to my bag and it worked out just fine. If you have a better way to attach this chains on your bag then do it. I don't really have many resources here.


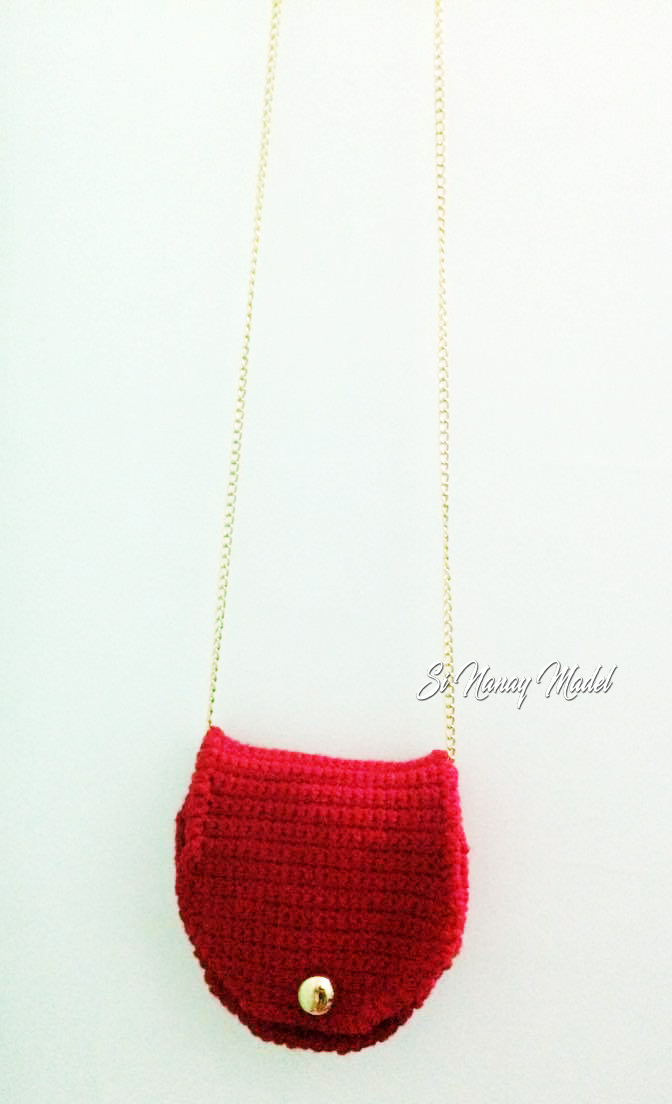
I am actually happy how it turned out. I love this bag, it's small and cute. My niece is already eyeing to use this one. Adults can use it also.
Hope you enjoy making this project and don't forget to Tag me on Instagram and Twitter with your finished project and also like my Page in Facebook, Si Nanay Madel. I would love to see what you've done and Pin it also on Pinterest.

Thank you and God bless!

xoxo


Nanay Madel


Don't forget to share on Facebook, Pinterest, Twitter and more.  
**Please do not copy and post any pattern from this blog and claim it as your own. This pattern is limited to personal use only.  Please do not re-publish all photos from this blog as your own. You may make and sell products from my pattern. Please also link back to my post. Any link back will be much, much appreciated. Thank you very much. **


Thought of the Day

October 29, 2017

It is by partaking of the divine nature that men and women escape the corruption that is in the world through lust. - TDG 70

Tuesday, October 17, 2017

Holiday Hat

The holidays are surely fast approaching. October is almost done and before we know it, it's the end of the year already. So many have already made something for the coming season. Blankets, ornaments, hats and so on and so forth. Here is my Holiday Hat Crochet Pattern. It's simple and fast to make. This would surely come in handy as the season approaches.  So here it is...

Materials:
  • Color A = Red Heart With Love Eggshell (60-80 yards)
  • Color B = Red Heart With Love Holly Berry (60-80 yards)
  • Color C = Red Heart Soft True Green  (60-80 yards)
  • H/5.00mm Crochet Hook
  • Tapestry Needle
  • Scissors


Terms Used

  • CH(s) - Chain(s)
  • HDC - Half Double Crochet
  • DC - Double Crochet


Sizes
Toddler - Adult
 Instructions are written in ADULT size, other sizes are indicated in the pattern as you go along and in parenthesis, Adult (Toddler, Child, Small Adult.


Instructions
R1. With Color B, make a magic ring and secure it with a stitch. CH 2, 10 DC into the ring, closed the ring tightly and change to Color A. Join with a slip stitch in the first stitch. (10 DC).

R2. CH 1, 2 HDC in each of the stitch all around. Change to Color C, join with a slip stitch in the first stitch.(20DC)

R3. CH 2, 1 DC in the first stitch, 2 DC in next. * 1 DC in the next stitch, 2 DC in next*, repeat all the way around. Change to Color A, join with a slip stitch in the first stitch. (30 DC)

R4.CH 1, 1 HDC in the first 2 stitches, 2 HDC in next. * 1 HDC in each of the next 2 stitches, 2 HDC in next*. Repeat all the way around. Change to Color B, join with a slip stitch in the first stitch. (40 HDC)

R5. CH 2, 1 DC in the first 3 stitches, 2 DC in next. * 1 DC in each of the next 3 stitches, 2 DC in next*. Repeat all the way around. Change to Color A, join with a slip stitch in the first stitch. (50 DC)

R6. CH 1, 1 HDC in the first 4 stitches, 2 HDC in next. * 1 HDC in each of the next 4 stitches, 2 HDC in next*. Repeat all the way around. Change to Color C, join with a slip stitch in the first stitch. (60 HDC) Toddler size stops here and proceed to Round 11

       R7 for Child Size. CH 2, 1 DC in the first 9 stitches, 2 DC in next. * 1 DC in each of
                the next 9 stitches, 2 DC in next*, repeat all the way around. Change to Color A,
                join with a slip stitch in the first stitch. (66 DC)
       R8 for Child Size.  CH 1, 1 HDC in each stitch around. Change to Color B,
                join with a slip stitch in the first stitch. (66 HDC)
               Child size stops here and proceed to Round 9


R7. CH 2, 1 DC in the first 5 stitches, 2 DC in next. * 1 DC in each of the next 5 stitches, 2 DC in next*. Repeat all the way around. Change to Color A, join with a slip stitch in the first stitch. (70 DC) Small Adult stops here and proceed to Round 12

R8. CH 1, 1 HDC in the first 6 stitches, 2 HDC in next. * 1 HDC in each of the next 6 stitches, 2 HDC in next*. Repeat all the way around. Change to Color B, join with a slip stitch in the first stitch. (80 HDC)

R9. CH 2,  1 DC in each stitch around. Change to Color A, join with a slip stitch in first stitch (80(Adult), 66(Child) DC)

R10. CH 1, 1 HDC in each stitch around. Change to Color C, join with a slip stitch in the first stitch. (80(Adult), 66(Child) DC)

R11.  CH 2,  1 DC in each stitch around. Change to Color A, join with a slip stitch in first stitch (80(Adult), 66(Child) 60(Toddler) DC)

R12. CH 1, 1 HDC in each stitch around. Change to Color B, join with a slip stitch in the first stitch. (80(60,66,70) HDC)

R13. Repeat Round 11.

R14. Repeat Round 12 but change to Color C

R15. Repeat Round 11.

R16. Repeat Round 12. For Toddler and Child size do not change color and stop here, then fasten off.

For Small Adult and Adult Size.
R17. Repeat Round 11.

R18. Repeat Round 12 but change to Color C

R19. Repeat Round 11.

R20. Repeat Round 12. For Adult and Small Adult size, you can use Single Crochet in this last round instead of HDC and use the Alternative Flap Instructions down below the pattern.

Fasten off and weave all ends.

Earflap.
Adult(Toddler, Child, Small Adult or Teenager)

R1. Count  9 (6,7,8) stitches from where you fasten off your yarn. Attach Color B, and CH 1. HDC 1 in each 18 (12,14,16) stitches. CH 1 and turn. (18(12,14,16) DHC)

R2. HDC decrease, HDC 1 in each of the next 14(8,10,12) stitches. HDC decrease in the last 2 stitches, CH 1 and turn. (16(10,12,14) HDC)

R3. HDC in each stitch (16(10,12,14) HDC)

R4. HDC decrease, HDC 1 in each of the next 12( 6, 8, 10) stitches. HDC decrease in the last 2 stitches, CH 1 and turn. (14(8,10,12) HDC)

R5. HDC in each stitch  (14(8,10,12) HDC)

R6. HDC decrease, HDC 1 in each of the next 10( 4, 6, 8) stitches. HDC decrease in the last 2 stitches, CH 1 and turn. (12(6, 8, 10) HDC)

R7. HDC in each stitch (12(6, 8, 10) HDC)

R8. HDC decrease, HDC 1 in each of the next 8 (2, 4, 6) stitches. HDC decrease in the last 2 stitches, CH 1 and turn. (10, (4, 6, 8) HDC)

R9. HDC in each stitch  (10, (4, 6, 8) HDC)

          R10 Toddler. HDC decrease, HDC decrease. CH 1 and turn. (2DHC)

          R11Toddler. HDC in each stitch (2 HDC). Fasten off and weave in ends.

R10. HDC decrease, HDC 1 in each of the next 6 (2, 4) stitches. HDC decrease in the last 2 stitches, CH 1 and turn. (8 ( 4, 6) HDC)

R11. HDC in each stitch  (8 ( 4, 6) HDC)

        R12 Child. HDC decrease, HDC decrease. CH 1 and turn. (2DHC)

        R13 Child. HDC in each stitch (2 HDC). Fasten off and weave in ends.

R12. HDC decrease, HDC 1 in each of the next 4 (2) stitches. HDC decrease in the last 2 stitches, CH 1 and turn. (6(4) HDC)

R13. HDC in each stitch  (6(4) HDC)

        R14 Small Adult or Teenager. HDC decrease, HDC decrease. CH 1 and turn. (2DHC)

        R15 Small Adult or Teenager. HDC in each stitch (2 HDC). Fasten off and weave in ends.

R14. HDC decrease, HDC 1 in each of the next 2 stitches. HDC decrease in the last 2 stitches, CH 1 and turn. (4 HDC)

R15. HDC in each stitch  (4 HDC)

R16. HDC decrease, HDC decrease. CH 1 and turn. (2DHC)

R17. HDC in each stitch (2 HDC). Fasten off and weave in ends,

Do the other side of the flap. Skipped 24 stitches from the 12th stitch of R1, and attached your Color B.  And Repeat the process from R1 to R11. Fasten off and weave all ends.

Attached Color A at the back of the hat. By the way, the Back of the hat is where the lesser skipped stitches are. Then CH 1 and SC in each stitch including the earflaps. Join with a slip stitch in the first stitch. Optional but highly recommended to crab stitch each stitch using Color A also. Then join with a slip stitch in the first stitch and fasten off and weave all ends.

Alternative Flap for Adult and Small Adult is to use Single Crochet instead of Half Double Crochet. And also changing colors like the main hat.  It would look like the picture below. 

 You can also add some pompom to your hat.

And here are my cute and crazy models.


That's it, I hope you all learn something and enjoy this post. If you have any questions, comments or suggestion just leave a message in the comment box and I will gladly answer them

Hope you enjoy making this project and don't forget to Tag me on Instagram and Twitter with your finished project and also like my Page in Facebook, Si Nanay Madel. I would love to see what you've done and Pin it also on Pinterest.

Thank you and God bless!

xoxo


Nanay Madel


Don't forget to share on Facebook, Pinterest, Twitter and more.  

**Please do not copy and post any pattern from this blog and claim it as your own. This pattern is limited to personal use only.  Please do not re-publish all photos from this blog as your own. You may make and sell products from my pattern. Please also link back to my post. Any link back will be much, much appreciated. Thank you very much. **


I always make sure to share also because I learned to crochet for free from some very generous bloggers


Thought of the Day


October 17, 2017


As soon as there was sin, there was a Saviour. - HP 13


Monday, October 9, 2017

The Nicole Earflap Hat

I love the colors of Autumn, although I have never experienced it myself, I love the pictures that I saw. Spring is also one I love, how the flowers bloom and so many different colors. I was wondering if I can make a pumpkin hat, but dismiss the idea of it because I want something that can be worn even if it is not in season.  And so I decided to make this hat, it has an earflap for added warmth during the cold season.

The stitches are simple and it's the first time I used the Front Post Single Crochet. I never know I make post stitches using a Single Crochet. It ended beautifully along with Double Crochet.

If you feel like you want to add more rows or make this hat slouchy, you can do so. Just continue adding the last few rows.

The gauge is 11 DC by 6 rows = 3 inches square. But the gauge is not that important, I guess that what's you usually got when you use a worsted yarn and an I hook.

Materials, Gauge, and Stitches Used with Photo Tutorial are all indicated in the pattern.  The pattern is now available on my Craftsy and Ravelry Store.


I wanted my pictures to look more "Autumny" but it clearly shows that I live in a Tropical Place. Even my dried "sticks" "wood" in the first picture surely shows I am in the tropics. It's a dried coconut steam, haha, I don't have an acorn.

When I took pictures of this hat, some friends of mine decided to join. hehe. That's my son's fingers and some friendly grasshopper.


So I do hope you'll love making and also wearing this hat and don't forget to Tag me on Instagram and Twitter with your finished project and also like my Page in Facebook, Si Nanay Madel. I would love to see what you've done and Pin it also on Pinterest.

That's it, I hope you all learn something and enjoy this post. If you have any questions, comments or suggestions just leave a message in the comment box and I will gladly answer them. Thank you and God bless!

xoxo


Nanay Madel


Don't forget to share on Facebook, Pinterest, Twitter and more.  
**Please do not copy and post any pattern from this blog and claim it as your own. This pattern is limited to personal use only.  Please do not re-publish all photos from this blog as your own. You may make and sell products from my pattern. Please also link back to my post. Any link back will be much, much appreciated. Thank you very much. **
I always make sure to share also because I learned to crochet for free from some very generous bloggers


Thought of the Day

October 9, 2017

The same law that was engraved on tablets of stone is written by the Holy Spirit on the heart. - BOE 181

Thursday, October 5, 2017

Solid Granny Square Mini Bag


I made this bag using the Solid Granny Squares. Granny squares are so versatile, I love how I can turn it into anything else. That's why I believe that Granny Squares are the basic in crochet. It never goes old.

Materials

  •  Any type of yarn (with mine I used Gantsilyo Guru's Light Milk Cotton #3 yarn)
  • Tapestry needle
  • Cords for the handle
  • Scissors
  • Cloth for lining (optional)


Terms Used

  • CH - chain
  • SC - Single Crochet
  • DC - Double Crochet
Special Stitch

  • Mattress Stitch - The stitch I used in joining the squares. Click the link and you'll be directed to a video on how to do the mattress stitch.


\ Instructions.

1. Make 10 Solid Granny Squares. On how to make the Solid Granny Squares click here. Block the squares nicely.  For some ideas on DIY blocking station or on how to block your squares, I recommend the 3 links below, although there are so many options out there, I find these 3 to be easy to follow.
  1. Crochet Pixel Square Blocking (docking) Station
  2. Modular Crochet Blocking Station
  3. DIY Blocking Station for Crochet Squares

2. After all the blocking. Arrange your squares as shown below. I choose to have two colors for my bag. I did not intend it to look this way, I just made 5 black squares and 5 orange gold. Then when I lay them out I could not decide where my blacks should go or where the orange squares should go. I should have just made 4 black and 6 orange or vice versa. But then I am too lazy to make more or change the colors because I was also adamant for the bag to be done. But then when I look at it, it's not that bad, in fact, I like it even more. So it's up to you if you want the colors to be like mine or not, you can even make it also in one color. I did think of that also and I'd prefer the black color, but I don't think I can work with black yarn. So that's how I ended up with the colors of my mini bag. 

Then join the squares using Mattress Stitch. I joined the squares using the mattress stitch but I only sew through the back loops only. Join all squares across following the red arrow below.  Do not join them one by one and cut your yarn after each join. Join them continuously until all the squares in that line are joined together, then proceed to the next line of squares.
After all the squares are joined in that direction, then sew on the other side following the red arrow below.
Now fold it in half following the white dotted lines as the center. Align the red dots when folding, that will be the opening of your bag.
DO NOT sew the opening, the one with red arrows below.

Weave all your ends and let's make the handle. I added cords inside the handle to prevent it from stretching too much. 

Handle

1. Measure the cord up to 23 inches. But if you want a longer cord it's up to you. Then burn the ends of the cords a little to prevent the cords from splitting.

2. Attach the cords as shown in the pictures below. Attach it to the second hole.

And sew both ends of the cord.

Let's make the handle itself. Make 2 
R1. CH3, SC in the 2nd CH from the hook. CH1 and turn. (2sc)
R2. 2 SC in first CH, 2 SC in last. CH1 and turn (4 SC)
R3. 2 SC in first, 1 SC in each of the next 2 stitches, 2 SC in last. CH1 and turn. (6 SC)
R4. 2 SC in first, 1 SC in each of the next 2 stitches, 4 SC in last. CH1 and turn. (8 SC)
R5-R37. SC in each stitch until the end. CH1 and turn. (8SC)
R38. SC decrease, 1 SC in each of the next 4 stitches, SC decrease. CH 1 and turn. (6SC)
R39. SC decrease, 1 SC in each of the next 2 stitches, SC decrease. CH 1 and turn. (4SC)
R40. SC decrease, SC decrease. CH 1 and turn (2SC)
R41. SC in each stitch. (2SC).  Leave a long tail for sewing. Fasten off and weave in ends.

Then attach the handle as shown in the pictures below.

Sew closed the handle using a tapestry needle and yarn. 


Then let's cover that ugly part where you attached your handles. 

Make 4
R1. CH3, SC in the 2nd CH from the hook. CH1 and turn. (2sc)
R2. 2 SC in first CH, 2 SC in last. CH1 and turn (4 SC)
R3. 2 SC in first, 1 SC in each of the next 2 stitches, 2 SC in last. CH1 and turn. (6 SC)
R4. 2 SC in first, 1 SC in each of the next 2 stitches, 4 SC in last. CH1 and turn. (8 SC)
R5-R6. SC in each stitch until the end. CH1 and turn. (8SC)
R7. SC decrease, 1 SC in each of the next 4 stitches, SC decrease. CH 1 and turn. (6SC)
R8. SC decrease, 1 SC in each of the next 2 stitches, SC decrease. CH 1 and turn. (4SC)
R9. SC decrease, SC decrease. CH 1 and turn (2SC)
R10. SC in each stitch. (2SC).  Leave a long tail for sewing. Fasten off and weave in ends.

Attach them to the insides of your bag where you attach the handle before. The picture below shows what it looks like after sewing them. It will leave a clean finished to your bag.


Then line your bag with a cloth. It will make add life to your bag. It will prevent the bag from stretching too much.

And your bag is done. The bag measures 11 inches to a foot wide and 7-8 inches long excluding the handles.   I found this pin on Pinterest on how to arrange your granny squares. It really is very helpful. You can make a small bag or a big bag, it includes also how many squares to make.  Hope this will be useful to you also.


That's it, I hope you all learn something and enjoy this post. If you have any questions, comments or suggestion just leave a message in the comment box and I will gladly answer them

Hope you enjoy making this project and don't forget to Tag me on Instagram and Twitter with your finished project and also like my Page in Facebook, Si Nanay Madel. I would love to see what you've done and Pin it also on Pinterest.

Thank you and God bless!

xoxo


Nanay Madel


Don't forget to share on Facebook, Pinterest, Twitter and more.  
**Please do not copy and post any pattern from this blog and claim it as your own. This pattern is limited to personal use only.  Please do not re-publish all photos from this blog as your own. You may make and sell products from my pattern. Please also link back to my post. Any link back will be much, much appreciated. Thank you very much. **

I always make sure to share also because I learned to crochet for free from some very generous bloggers


Thought of the Day

October 4, 2017

Never lose sight of the fact that you belong to God, that He has bought you with a price. - CM 53


Sunday, October 1, 2017

Billie Hat & Cowl Pattern ( Hat Pattern)


This Pattern here is the hat version of my Billie Hat & Cowl Set Pattern. This Hat is kind of a little slouch on the back. You can adjust the Hat by adding or reducing some rounds, starting Round 8. This hat pattern is written in Adult size. Other sizes are indicated through the pattern and are in parenthesis. Adult (Toddler, Child, Teenager)

For the Cowl Pattern Click Here.


Materials (Hat only)

  • Red Heart with Love in White (120-150 yards) and True Blue (80-100 yards)
  • I/5.5 mm Crochet Hook
  • Tapestry Needle
  • Pompom Maker
  • Scissors
  Terms Used   
  • CH(s) – Chain(s)
  • SC – Single Crochet
  • HDC – Half Double Crochet
  • DC – Double Crochet
  • FPDC – Front Post Double Crochet
  • BPDC – Back Post Double Crochet
Gauge
·         10 DC = 3 cm

Special Stitch
Foundation Single Crochet – – Chain 2, insert hook into the first chain, yarn over and pull up a loop. Yarn over again, and pull through all loops. *Insert the hook in the base of the previous stitch, yarn over and pull up a loop. Yarn over again and pull through all loops.* Just repeat this process until your desired length or desired number of foundation Single Crochet. If you want a video tutorial on how to make foundation single crochet, here is a link from Moogly.  

Difficulty

·         Easy, Beginner

Hat.
The hat is written in Adult size. Other sizes are indicated through the pattern and are in parenthesis.
Adult (Toddler, Child, Teenager)

R1. With color A, Make Magic Ring and secure it with a stitch. Ch2, DC 10 into the ring, Closed the ring tightly. Change to color B and join with a slip stitch in first st. (10 DC)

R2. Ch1, HDC 2 in each stitch around. Change to Color A and join with a slip stitch in the first stitch. (20 HDC)

R3. CH2, DC in first stitch, 2 DC in next. * 1 DC in next stitch, 2 DC in next* Repeat all around. Change to Color B and join with a slip stitch in the first stitch.  (30 DC)

R4. CH1, HDC in the first 2 stitches, 2 HDC in the next. * 1 HDC in each of the next 2 stitches, 2 HDC in next*. Repeat all around. Change to color A and join with a slip stitch in the first stitch. (40 HDC). 

R5 for toddler only.  Ch 2, DC in the first 10 stitches, 2 DC in next. *1 DC in each of the next 10 stitches, 2 DC in next* Repeat all around. Change to color B and join with a slip stitch in first stitch ( 44 DC) Proceed to Round 8.

R5. CH 2, DC in the first 3 stitches, 2 DC in next. * 1 DC in each of the next 3 stitches, 2 DC in next.* Repeat all around. Change to color B and join with a slip stitch in the first stitch. (50 DC). If you are making this for a CHILD, stop right here and proceed to Round 8. For the Teenager and Adult proceed as follows.

R6. CH1, HDC in the first 4 stitches, 2 HDC in next. * 1 HDC in each of the next 4 stitches, 2 HDC in next* Repeat all around. Change to Color A and join with a slip stitch in the first stitch. ( 60 HDC)

R7 for Teenager size only. CH 2, DC in each stitch all the way around. Change to Color B and join with a slip stitch in the first stitch. (60 DC) Proceed to Round 8.

R7.  CH2.  DC in the first 5 stitches, 2 DC in next. * 1 DC in each of the next 5 stitches, 2 DC in next.* Repeat all around. Change to color  B and join with a slip stitch in the first stitch. (70 DC)

R8. CH1, SC & DC in the first stitch.* Skip a stitch, SC & DC in next stitch* Repeat till end.  Change to Color A. Join with a slip stitch in the first stitch. ( 22 sc & dc cluster or 44 sts for TODDLER size, 25 sc & dc cluster or 50 sts for a CHILD size, 30 sc & dc cluster or 60 sts for TEENAGER size, and 35 sc & dc cluster or 70 sts for an ADULT size)

R9. CH1, SC & DC in the first stitch.* Skip a stitch, SC & DC in next stitch* Repeat till end. Do not change Color. Join with a slip stitch in the first stitch. ( 22 sc & dc cluster or 44 sts for TODDLER size, 25 sc & dc cluster or 50 sts for a CHILD size, 30 sc & dc cluster or 60 sts for TEENAGER size, and 35 sc & dc cluster or 70 sts for an ADULT size)

R10 . CH1, SC & DC in the first stitch.* Skip a stitch, SC & DC in next stitch* Repeat till end.  Change to Color B. Join with a slip stitch in the first stitch. ( 22 sc & dc cluster or 44 sts for TODDLER size, 25 sc & dc cluster or 50 sts for a CHILD size, 30 sc & dc cluster or 60 sts for TEENAGER size, and 35 sc & dc cluster or 70 sts for an ADULT size)

Repeat R8 to R10 until Round 15 for Toddler, Round 18 for Child size and Round 23 for both Teenager and Adult. All ending with Round 8.

R(16,19) 24. With color A. SC in each stitch around. Do not change color, join with a slip stitch in the first stitch.

R(17, 20) 25.Ch2, *FPDC, BPDC * in each stitch till end. Join with a slip stitch in the first stitch.


R(18, 21) 26.Ch2, *FPDC, BPDC * in each stitch till end. Join with a slip stitch in the first stitch.

Fasten off and weave all ends.

For your hat use the biggest pompom maker you have. And make it like the photo below. So that you’ll end up with a pompom half blue and half white


I like how simple and easy to make this whole set. I had fun making them, it only took me a few hours making the whole set. I was so happy with this project. I always go for quick and easy ones and this project did not fail me.

Hope you enjoy making this project and don't forget to Tag me on Instagram and Twitter with your finished project and also like my Page in Facebook, Si Nanay Madel. I would love to see what you've done and Pin it also on Pinterest.

That's it, I hope you all learn something and enjoy this post. If you have any questions, comments or suggestions just leave a message in the comment box and I will gladly answer them. Thank you and God bless!


xoxo


Nanay Madel


Don't forget to share on Facebook, Pinterest, Twitter and more.  
**Please do not copy and post any pattern from this blog and claim it as your own. This pattern is limited to personal use only.  Please do not re-publish all photos from this blog as your own. You may make and sell products from my pattern. Please also link back to my post. Any link back will be much, much appreciated. Thank you very much. **
I always make sure to share also because I learned to crochet for free from some very generous bloggers


Thought of the Day

October 1, 2017

Not because we first loved Him, does God love us; but "while we were yet sinners" (Romans 5:8) Christ died for us. - AG 10