Sunday, November 20, 2016

Crochet Drawstring Backpack


I made this bag for my  eldest.  I have never made a bag for him yet, because I was thinking of making something not for babies but not for adult also. Something for a little big boy. He is 7 years old and he won't appreciate if I make him some character bag, he won't even take a look at it. He is so proud to be a "big boy" already. So I made this drawstring backpack. I did not plan for this to be in 2 colors. It is supposed to be just the fleck one, but I run out of yarn, so added the black yarn. and it turned out fine and actually much better.

The design of this bag is very adjustable.. You can make a bigger one by adding more chains in the beginning and more rows. You can either make this in one color or more.  I did not indicate in the pattern when to change color, because it is not necessary, use your imagination. You can even make this in rainbow colors if you want to.


Materials

Stitches used:
  • ch - chain
  • sc - single crochet
  • sl st - slip stitch 

Instructions:

Row 1. Leave a long tail at the beginning of your work before starting about 2 feet, we will use this for sewing the fold use to hold our cord. Then chain 90 plus 1. SC in the 2nd chain from the hook, and the rest of the chains. Chain 1, turn.

Row 2. SC in the first stitch until the end. Chain 1, turn. 

Repeat Row 2 until your desired width of the bag is achieve. For this bag I was only up to Row 42. Then fasten off and leave a long tail also in this side for sewing again the other side of the bag to hold the cord. Make sure that the tails are on the opposite ends and side of your rectangle. Just like the illustration below

We are going to fold both ends of the rectangle and stitch it with a simple whip stitch. This is where our cord will go through.  My two tails are in different colors, and since this bag is in two colors also, when I fold and stitch them, the white one would go to the black part and the black yarn would go to the white part. But in the front it doesn't really show that much. So I just leave it like that.

See? it really doesn't show that much. So now that you're done sewing the fold, let's fold the bag in the middle and sew both sides using the whip stitch also. BUT do not sew till the top for we will insert our cord in there. 
Then let's add the finishing touches. This is were you insert your cord also.  The pattern for this is simply chain 6, sc in the 2nd chain from the hook, and sc till the end, chain 1 and turn. Repeat sc all the stitches until row 4. Leaving also on both ends a long tail for sewing.  Make two (2). I made one in aran fleck and one in black also. Then sew this small piece into the back of your bag.


Now in inserting the cord, i follow this video on Youtube. Just watch till the last part where she insert the cords. I hid the knots at the folded area so that it won't show. 

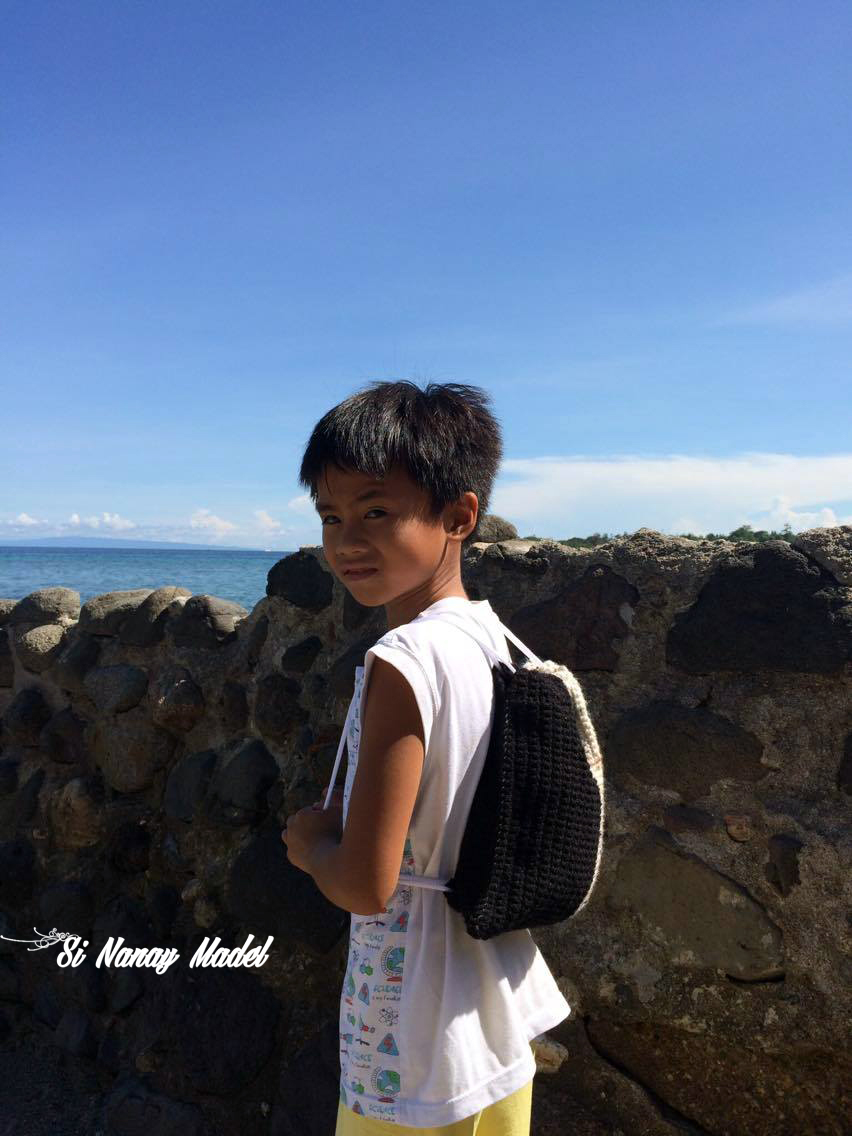
Here are some pictures of my son wearing it. At first he doesn't like it ( yes that's true) he dislike everything that I made for him, for he feels like I am only making things for babies. When I told him that even his father would wear this one, he did not hesitate anymore. He even use this one at school during examination day. And I think he loves it already. 

So that's it. I hope you all learn something and enjoy this post. If you have any questions, comments or suggestion just leave a message on the comment box and I will gladly answer them. Thank you and God bless!


xoxo

Nanay Madel


Don't forget to share on facebook, pinterest , twitter and more... Please bear with my pictures, I just took them using my phone. Thanks! 

**Please do not copy and post this pattern and claim it as your own. Please do not re-publish all photos from this blog as your own. You may make and sell products from my pattern. Please also link back to my post. Any link back will be much, much appreciated.Thank you very much. **
I always make sure to share also because I learn crochet for free and I got all of my patterns from all over the internet from some very generous bloggers. So please also click the links and support the bloggers.


Thought of the Day

November 20, 2016

The Sabbath and the family were alike instituted in Eden, and in God's purpose they are indissolubly linked together. - SD 181


Thursday, November 17, 2016

Free Pattern: Christmas Ornaments


It's the time of the year. Christmas season is almost here. In the Philippines, Christmas time starts so early. It can even start as early  as September.  But now it is almost December and I can see so many houses decked with Christmas decorations already. Even in a tropical country like the Philippines, chilly winds do blow when Christmas time is near.

And since we all decorate our houses with everything Christmas, here are some Christmas ornaments for a crocheter like me to do. I plan to make all of them, and I wish I can this time. I always plan to make so many Christmas Crochet and end up not even making half of it. I am super busy working full time and also being a mother and a wife, I don't think I can make any of then anymore.  But these patterns are so easy and quick, and I am hoping to do them all before Christmas time.  


  1. Caron Candy Cane Ornament
  2. Crochet Christmas Light Flowers by LookAtWhatIMade
  3. Crochet Star Ornament by One Dog Woof
  4. Fair Isle Evergreen & Snowflake Ornament by One Dog Woof  again - In the link is the Pattern for the evergreen. Just read on the post and you will see also the link for the snowflake.
  5. Pompom Christmas Ornament by PysselBolaget
These are all Free Patterns. I can't wait to start making, although I might be too late already on starting one, as almost all are putting their decorations already. As I said these are so all so easy and quick, the pompoms appeal to me the most. So easy and yet they are so pretty. And If I can't set up a Christmas tree this time ( a long story why), the Christmas Light Flowers would come in handy for all my Christmas lights. 


So that's it. I hope you all learn something and enjoy this post. If you have any questions, comments or suggestion just leave a message on the comment box and I will gladly answer them. Thank you and God bless!


xoxo

Nanay Madel


Don't forget to share on facebook, pinterest , twitter and more... Please bear with my pictures, I just took them using my phone. Thanks! 

**Please do not copy and post any pattern on this blog and claim it as your own. Please do not re-publish all photos from this blog as your own. You may make and sell products from my pattern. Please also link back to my post. Any link back will be much, much appreciated.Thank you very much. **
I always make sure to share also because I learn crochet for free and I got all of my patterns from all over the internet from some very generous bloggers. So please also click the links and support the bloggers.

Thought of the Day

November 17, 2016

The Christian home is to be an object lesson, illustrating the excellence of the true principles of life. - AH 31


Tuesday, November 15, 2016

Crochet Panda Shoulder Bag


I've been wanting to make this little girl a bag. But can't seem to find the right pattern. I want it to be just small. Just enough for this little one put on her little things. Then I came up with this Cute Panda Bag. The yarn I used are purchased locally. It's cotton and is 8 ply, so you can substitute any yarn with that weight and type.

Please excuse my niece's outfit. It's really not that easy to make a 2 year old  model your work, even if that work is for her. So no time to change clothes or even to tie her hair. lol.


Materials
  • Cotton yarn (8 ply) in black and white
  • G /4.0 mm crochet hook
  • 2 Metal rings
  • Tapestry Needle
  • Scissors


Stitches used:
  • magic ring
  • ch - chain
  • sc - single crochet
  • dc - double crochet
  • hdc - half double Crochet
  • sl st - slip stitch


Instructions:
Round 1.   Ch 23. 2 Sc in  2nd chain from the hook, sc in each chain until the end (20 sc) with 5 sc at the last ch. Then continue on working to the other side of the chain to complete the round. Sc until the end with 3 sc in last ch, where the first 2 sc is located. Join with a sl st in first sc of the round, ch 1.

Round 2. 2 sc in each of the first 2 sc, then sc each of the next 20 sc's. 2 sc in each of the next 5 sc, then sc 20 in each stitches, 2 sc into the last 3 stitiches. Join with a sl st in first sc of the round, ch 1.

Round 3. *Sc, 2 sc * repeat 2 times, then sc 20 in each next stitches, *sc, 2sc* repeat 5 times. Sc 20 in each of the next stitches, *sc, 2 sc* 3 times. Join with a sl st in first sc of the round, ch 1.

Round 4. *Sc, sc,  2 sc * repeat 2 times, then sc 20 in each next stitches, *sc, sc,  2sc* repeat 5 times. Sc 20 in each of the next stitches, *sc, sc, 2 sc* 3 times. Join with a sl st in first sc of the round, ch 1.

Round 5. Sc in each stitches on the back loop only (BLO). Join with a sl st in first sc of the round, ch 1. (80sc)

Round 6 - 30.  Sc in each stitches on both loops now. Join with a sl st in first sc of the round, ch 1.
(80 sc).


Attaching the metal rings for the strap.

Round 31.  Sc in each 35 stitches, then attached the metal rings with 5 sc . ( Here's a video on how to attached metal rings. In this video I used hdc, but the principle is still the same with sc. )

Round 32. Sc in each stitches on both loops now. Join with a sl st in first sc of the round, ch 1.
(80 sc). 

Fasten off and weave all ends using your tapestry needle.


 For the straps. 

Row 1. Attached your yarn to your metal rings and sc 5, ch 1 and turn. 

Row 2-150.  Sc in each stitch, chain 1 and turn. ( you can adjust the length of the straps by adding more rows or lessening the rows of 5 single crochets.) At the end. Single Crochet 5 into the other metal ring. Fasten off and weave all ends using your tapestry needle.


For the panda face.

Ears. (Make 2 pairs of circles or 4 circles )

Round 1.  Make 6 sc into the magic ring . Do not join , just continue to work into the second round.

Round 2.  2 sc in each around.

Round 3. SC in first, 2 sc in next. Repeat around, then sl st into the next stitch, and and leave a long tail for sewing later. Only leave a long tail into 2 of the 4 circles.

Then with 4 circles join 2 circles by sewing them together using your tapestry needle. Do this also to the other pair.  And attached your ears in the front of the bag, about 12 to 15 sc apart.


Eyes.

White eyes.  Make 6 sc into the magic ring and fasten off. Make 2. Fasten off and leave a long tain for sewing

Black eyes.  Make 6 sc into the magic ring. Do not join , just continue to work into the second round.

Round 2.  2 sc in first sc. Hdc, Dc in next st. 2DC in next 2 sts. Hdc, dc in next st, 2 sc in last st. (12 sts)

Round 3. SC in first 2 st. hdc, dc in next st, dc 2 in next 2 st, dc in next 2 st, dc 2 in next st, dc in next, hdc in next st, sc 2 in next 2 st.

Round 4.   *sc, sc 2* repeat 2 times, *hdc, hdc2 * repeat 5 times, *sc, sc 2* repeat 2 times, then sl st into the next stitch, and and leave a long tail for sewing later


Nose.

Chain 6. SC in the 2nd chain from the hook, hdc, dc in next 2 sts, hdc, sc in last st. Chain 1 and continue to work in the other side of the chains. SC , hdc, dc in the next 2 st, hdc and sc in last. Chain and fasten off. Leave a long tail to sew later.


After all is done. Carefully sew all the pieces into the bag, using your tapestry needle. Don't forget to sew the mouth of the Panda. 

Here's a another picture of my niece modeling her own bag. When I said smile, this is all that she gave me and wry smile.. lol

So I guess that is all there is for this particular pattern. I hope you all learn something and enjoy this post. If you have any questions, comments or suggestion just leave a message on the comment box and I will gladly answer them. Thank you and God bless!


xoxo

Nanay Madel


Don't forget to share on facebook, pinterest , twitter and more... Please bear with my pictures, I just took them using my phone. Thanks! 

**Please do not copy and post this pattern and claim it as your own. Please do not re-publish all photos from this blog as your own. You may make and sell products from my pattern. Please also link back to my post. Any link back will be much, much appreciated.Thank you very much. **
I always make sure to share also because I learn crochet for free and I got all of my patterns from all over the internet from some very generous bloggers. So please also click the links and support the bloggers.


Thought of the Day

November 14, 2016

Pure air, sunlight, abstemiousness, rest, exercise, proper diet, the use of water, trust in divine power - these are the true remedies. - ML 135